BibTeX Imports
Overview
There is a good chance that citations of your publications are already stored in another software system such as a reference manager or database—for example, EndNote, Google Scholar, Mendeley, RefWorks, Scopus, Web of Science or Zotero. Those software systems enable you to pick records and then export them into a BibTeX file.
This feature enables you to upload that BibTeX file so that you do not need to rekey those citations. Below you will find details on how to export publication information from a few common software systems into a BibTeX file.
What is BibTeX?
BibTeX is the most broadly supported standardized way to structure publication citations in a file. This makes it easy to move citations between two software applications. You export citations from one software application into a BibTeX file and then import that file into another software application. In this case, you are exporting from another software application and importing into Faculty Success.
Tidbit #1: BibTeX is a very proven file format, as it was created more than 20 years ago, in 1985! Of course, it has evolved over the years.
Tidbit #2: You can open a BibTeX file with any common text editor, including Microsoft Word, TextEdit or Notepad. Here's an example of a BibTeX file that you can open. You will see that it is, perhaps surprisingly, straightforward to read.
How to Export Publications to a BibTeX File
From EndNote X6 (for Mac) or X7 (for Windows)
Step 1: Ensure the BibTeX output style exists in EndNote.
EndNote does not come with a standard BibTeX output style. If one does not exist for your account, you will need to download and install this additional output style.
To download and install the BibTeX output style:
- Go to EndNote Output Styles.
- Search for "BibTeX"
- Select the Download button for the BibTeX Export output style.
- For instructions on installing output styles please see the notes on the right-hand side of the EndNote Output Styles page.
Step 2: Export citations to a BibTeX File.
- Open EndNote.
- Open the library of references that you would like to export to BibTeX.
- Expand the drop-down list in the toolbar at the top of the screen that contains the placeholder "Select Another Style...", and select the BibTeX option. EndNote will now display the BibTeX-formatted citation in the preview screen.
Note: If BibTeX is not an option, follow the instructions in Step 1 to download and install the output style. - To complete the export of your selected citation information to a BibTeX File:
- Navigate to the File menu.
- Select Export.
- Enter your filename, choose where to save your exported file, and confirm that "BibTeX" is selected as the Output Style.
- Select Save.
For more information please see the EndNote help guide.
From EndNote Web
To export citations to a BibTeX file:
- Log in to MyEndNoteWeb. You will land on the My References page.
- To export your citations, navigate to Format and select the Export References link.
- Under References choose the library of citations you would like to export.
- Under Export Style choose BibTeX Export.
- Select to save the export file.
For more information please see the EndNote Web help guide.
From Google Scholar
Note:While it is possible to export a specific citation within your Google scholar search results to BibTeX, the intention is that one would first aggregate his or her citations via Google Scholar Citations prior to generating the BibTeX file for import into Faculty Success.
To export citations to a BibTeX file:
- Navigate to Google Scholar.
-
You will see two options at the top left, My Profile and My Library. Select My Profile.
- If you are not yet logged in, enter your credentials to sign in. Upon signing in you should land on your profile page where you will see a list of your "articles."
- Click on the check box next to each article you would like to export, to select all articles simply click on the checkbox at the very top.
- Once you’ve made your selections select the Export option and choose BibTex as your file format. This will convert your articles into BibTeX format.
- Next, you’ll need to copy the BibTex text into a text editor (such as Notepad for PC or TextEdit for Mac) and save it as a .txt or .bib file.
For more information please see the Google Scholar help guide.
From HeinOnline
To export citations to a BibTeX file:
- Log in to HeinOnline.
- Select the desired bookmarks.
- Locate the Options drop-down menu and select Export to BibTeX (Journal Articles).
- Select Submit.
- Save the resulting file as a .bib or a .txt file to your preferred location.
For more information please see the HeinOnline User’s Guide.
From Mendeley Desktop for Windows
Note: If Mendeley is your primary reference manager we recommend setting up "BibTeX Syncing" to streamline the maintenance of your BibTeX file of citations. BibTeX Syncing enables you to keep the content of one or more BibTeX files synced with your Mendeley library.
To set up BibTeX Syncing:
- Open Mendeley Desktop for Windows.
- Navigate to Tools and select Options.
- Select the BibTeX tab.
- Under BibTeX Syncing select Enable BibTeX syncing.
- Choose whether you would like to create one BibTeX file for your whole Mendeley library, one file per collection or one file per document.
- Select the path the location on your computer to which your BibTeX file(s) should be stored.
- Select Apply to save your new settings.
With BibTeX Sync enabled in Mendeley Desktop for Windows you can retrieve your BibTeX file(s) by navigating to the location on your computer where you have directed Mendeley to save those files.
If you do not have BibTeX syncing enabled, or would prefer to create a new BibTeX file from your selected citations, you can follow these steps:
To export citations to a BibTeX file:
- Within Mendeley Desktop for Windows, select your preferred folder under My Library.
- Select the citations you would like to export from the center pane. One easy way to do this is to right-click on one of the citations in that pane and choose the Select All option in the resulting menu. Another option is to select the first citation, hold Shift on your keyboard and then select the last citation with your mouse.
- Navigate to the File menu and select the Export option.
- Save the resulting .bib file to your preferred location.
For more information please see HOWTO: User Mendeley to create citations using LaTeX and BibTeX.
From PubMed
Digtial Measures offers a direct PubMed integration through PubMed Imports.
From RefWorks
To export citations to a BibTeX file:
- Log into RefWorks.
- Navigate to References or Tools and select Export.
- Choose to export All References or a specific folder.
- Select BibTeX as your Export Format.
- Select Export to Text File.
- Save the resulting file as a .bib file to your preferred location.
For more information please see the RefWorks help documentation.
From Scopus
Faculty Success offers a direct Scopus integration. Learn more about this feature.
From Web of Science
Faculty Success offers a direct Web of Science integration. Learn more about this feature.
From Zotero Online
To export citations to a BibTeX file:
- Navigate to Zotero's homepage and log in to your account.
- In the menu bar select My Library and from the list on the left-hand side, select the citation collection from which you would like to export.
- In the pane on the right select the citations you would like to export.
- Select the Export icon, which appears just above the Date Modified column.
- Select the BibTeX output option.
- Select to save the file.
- Navigate to the location where the file was saved.
- Rename the file and add a ".bib" or ".txt" extension (e.g., FacultyNameZoteroExport.bib).
For more information, please see the Zotero Online help guide.
From Zotero Standalone
To export citations to a BibTeX file:
- Within My Library in Zotero Standalone select the collection from which you would like to export.
- If you are using a Mac, select the Settings gear icon and choose Export Library... from the menu.
If you are using a PC, right click on the collection you would like to export and select Export Collection or select the collection from the list and go to File and select Export Library... from the menu. - In the Export... box select BibTeX as your format and select OK.
- Save the resulting file to your preferred location.
For more information please see the Zotero help guide through Zotero Standalone.
Disclaimer: These instructions may not reflect the reference points or specific sequence required for the creation of a BibTeX file in all versions of these tools. If you notice any discrepancies between your view of the tool and our instructions, we recommend reviewing the resources for the system you are interested in - many of which are linked to above - or searching for additional online resources regarding "exporting records to BibTeX" or something similar.
Return to Top
How to Use the Feature
Step 1: Upload a File
To begin, select the Intellectual Contributions screen. Here you will find a new button labeled Import Items. Select this button.
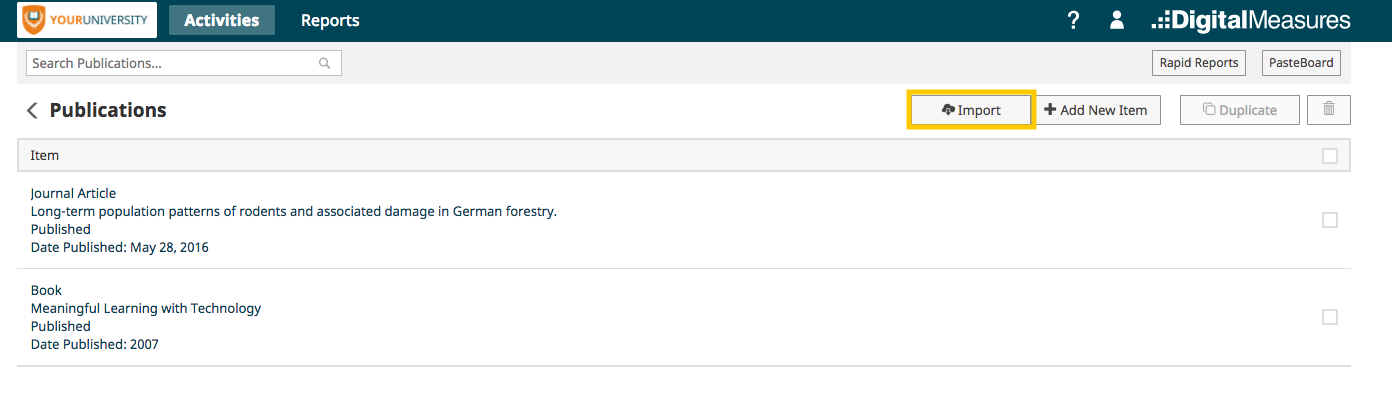
From here, upload a BibTeX file from your computer and then select Continue.
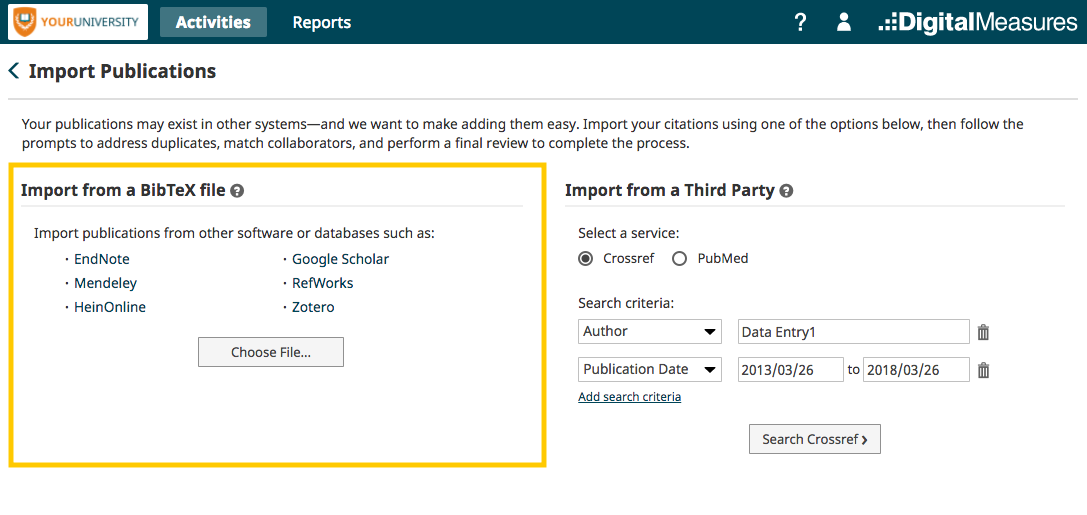
For details about how to create a BibTeX file from common software applications, see How to Create a BibTeX File above. A link to this information is also available in the instructional text on the screen.
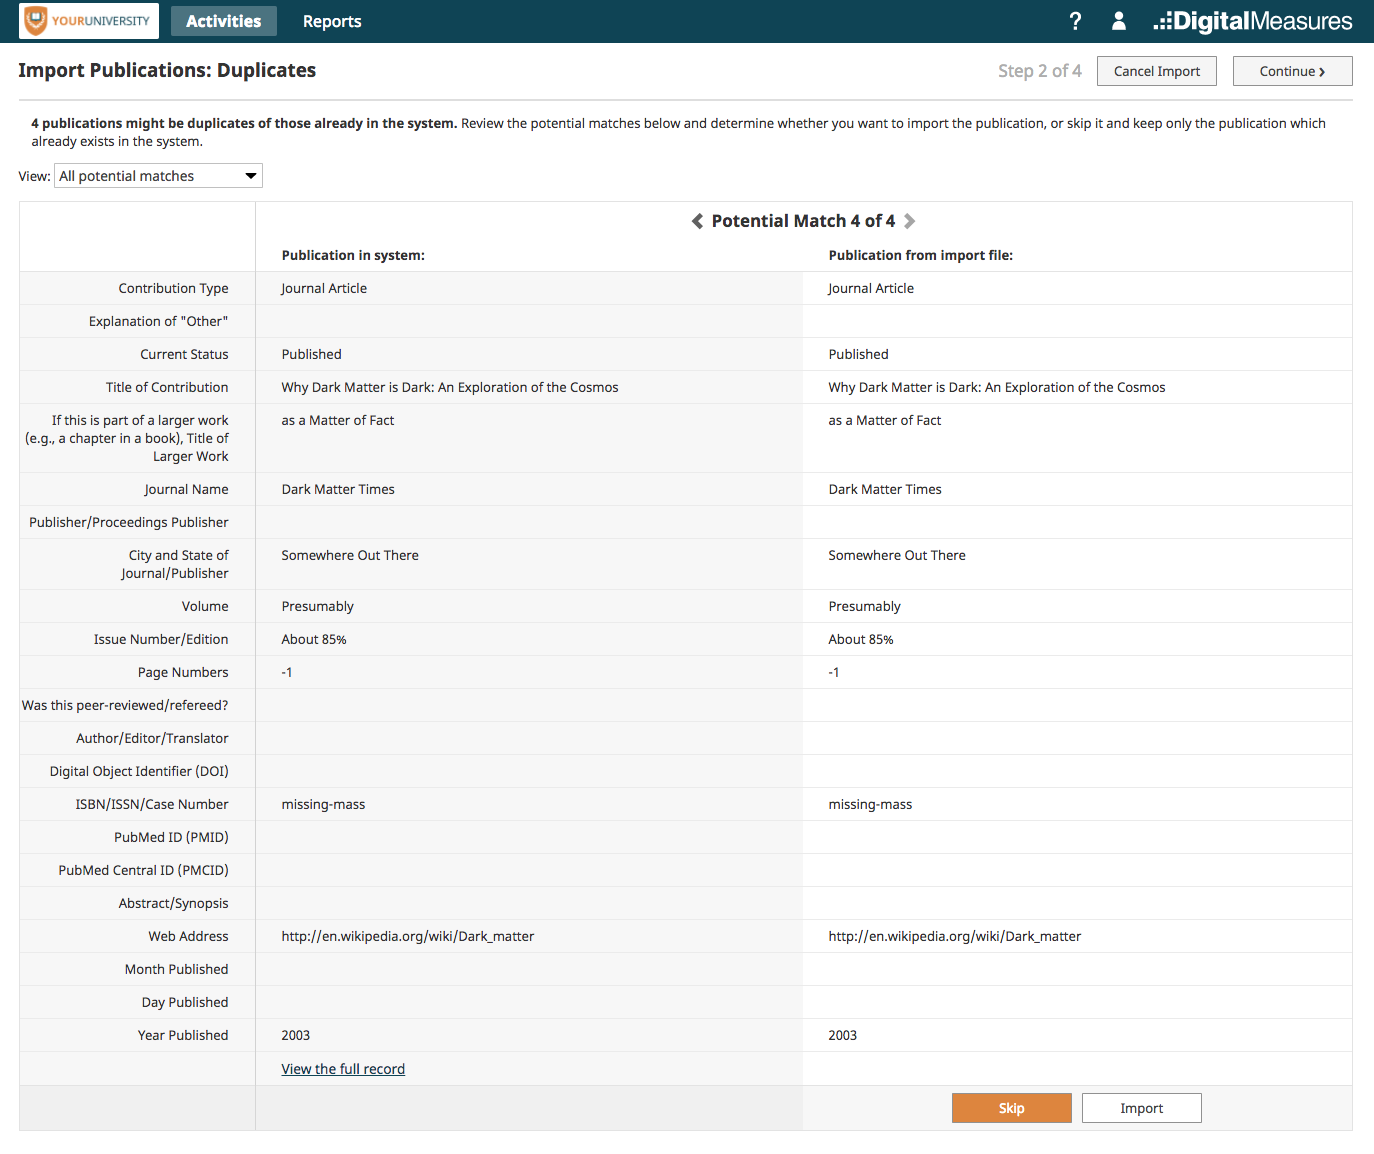
Step 2: Handle Duplicates
Faculty Success uses advanced duplicate detection logic to check the records from the file to see if any might already be in the system. We do not want duplicates! The records that might be duplicates are presented to you to review as seen below.
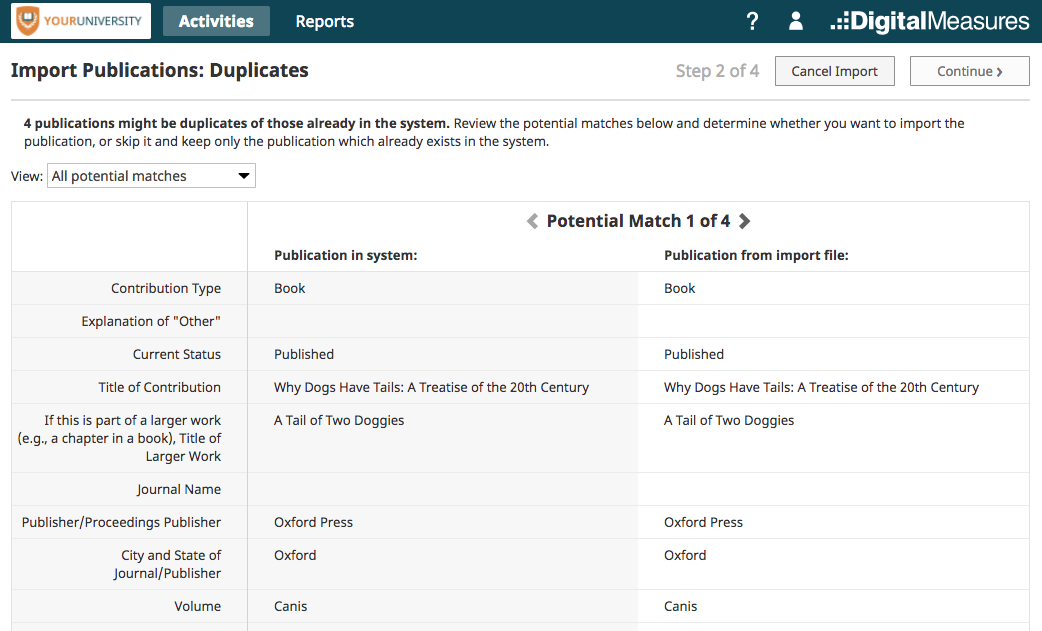
As you can see here, four potential duplicates were found. For each of the potentially duplicate records, you must now pick Skip or Import. You can limit the records that are displayed to all records or only those that still need review using the drop-down menu at the top.
Once you have indicated whether each record is or is not a duplicate, a Continue button will become available to select as you see below.
Step 3: Pick Collaborators
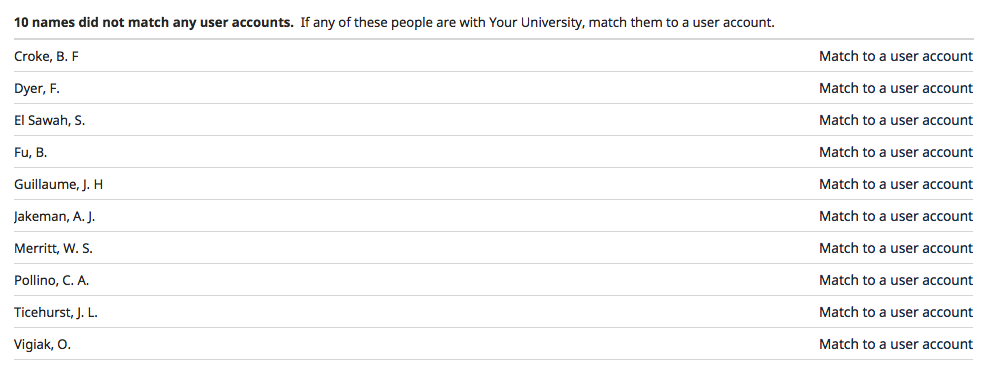
We now move on to link the names from the file to the user accounts in Faculty Success. Here, a list of the names of people that are in all of the records from the file are displayed. There are three possibilities for a name:
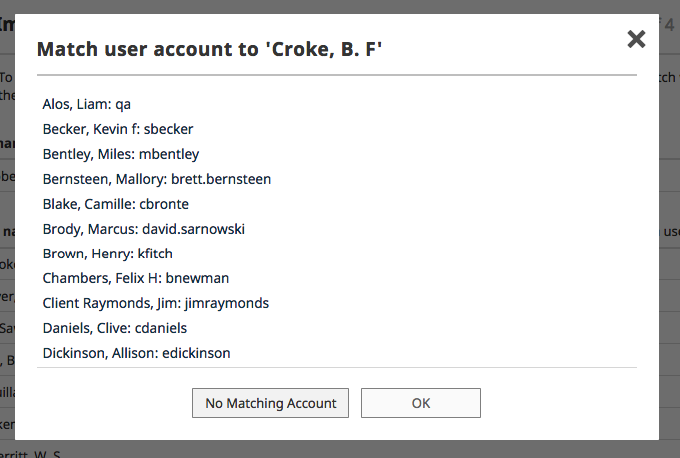
- Possibility A: It matched multiple names in Faculty Success, in which case you will see the message X potential matches have been found. Select correct user account.

Upon selecting the link Select correct user account, you will see this:
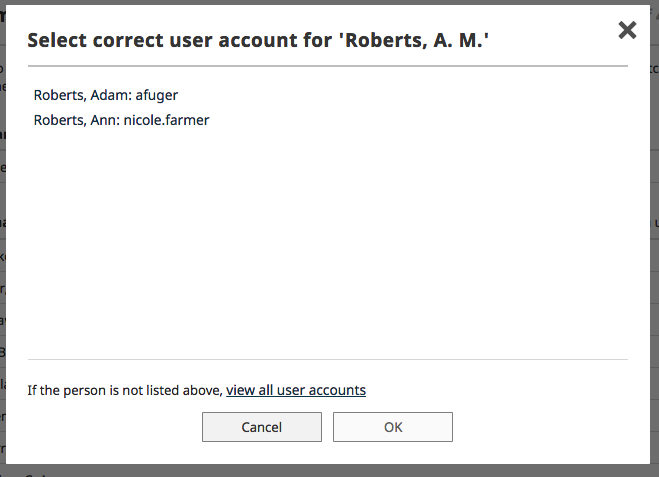
Selecting the link If the person is not listed above, view all user accounts will load all of the user accounts in Faculty Success to enable you to select the user from your campus.
If there are no matches with any user accounts, selecting the No Matching Account button will update the selection on the Pick Collaborators main screen to Match to a user account, meaning a link to a user account will not be made.
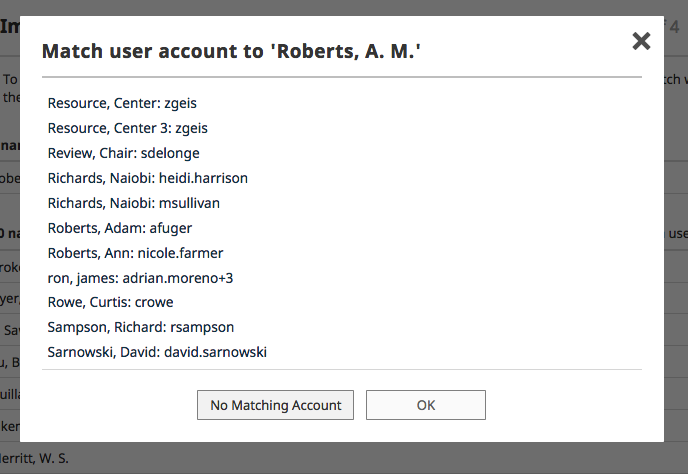
- Possibility B: It matched just one name in Faculty Success, in which case you will see the name of the user account that was matched with the text after it of Select a different user account.

Upon selecting the link Select a different user account, you will see this:
If there are no matches with any user accounts, selecting the No Matching Account button will update the selection on the Pick Collaborators main screen to Match to a user account, meaning a link to a user account will not be made.
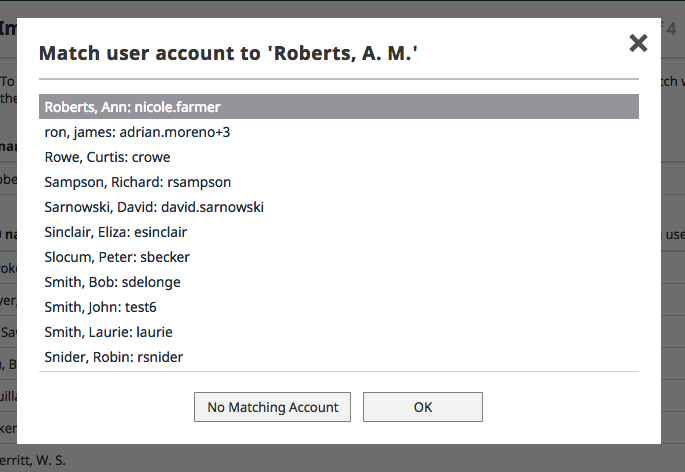
- Possibility C: It matched no names in Faculty Success, in which case you will see the message Match to a user account.
Upon selecting the link Match to a user account, you will see this:
Selecting the button No Matching Account will maintain the selection on the Pick Collaborators main screen of Match to a user account, meaning a link to a user account will not be made.
Select the Match to a user account link to make the proper assignment for each person's name.
Note: In order to proceed, you must resolve all of the names that are from Possibility A above, where a name matched multiple users.
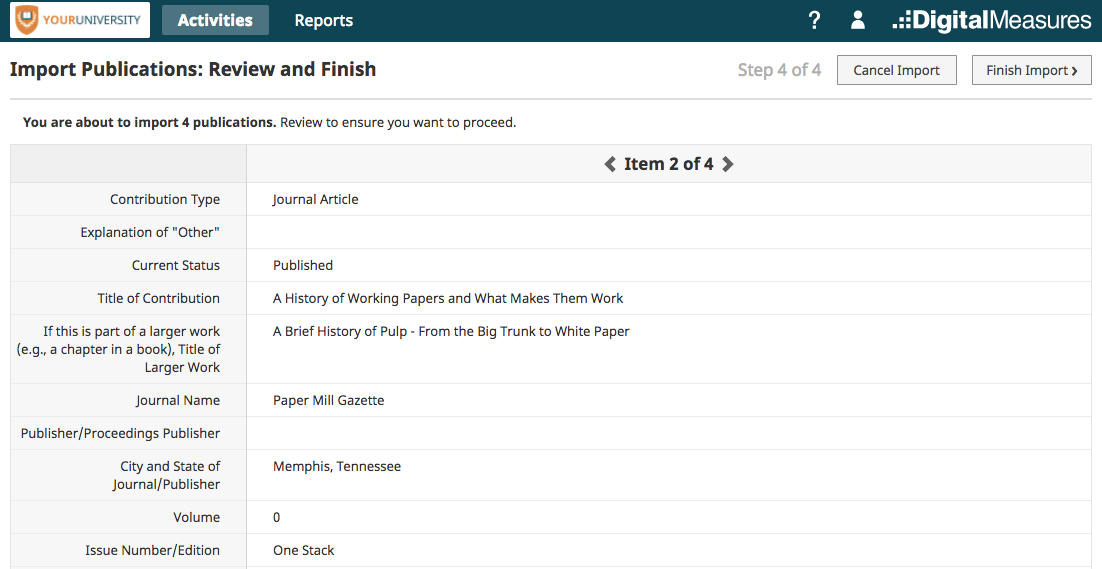
Step 4: Review Records and Import
This step enables you to flip through the records that you are about to load, to look them over to ensure everything looks good. Use the forward and reverse arrows to move through the records.
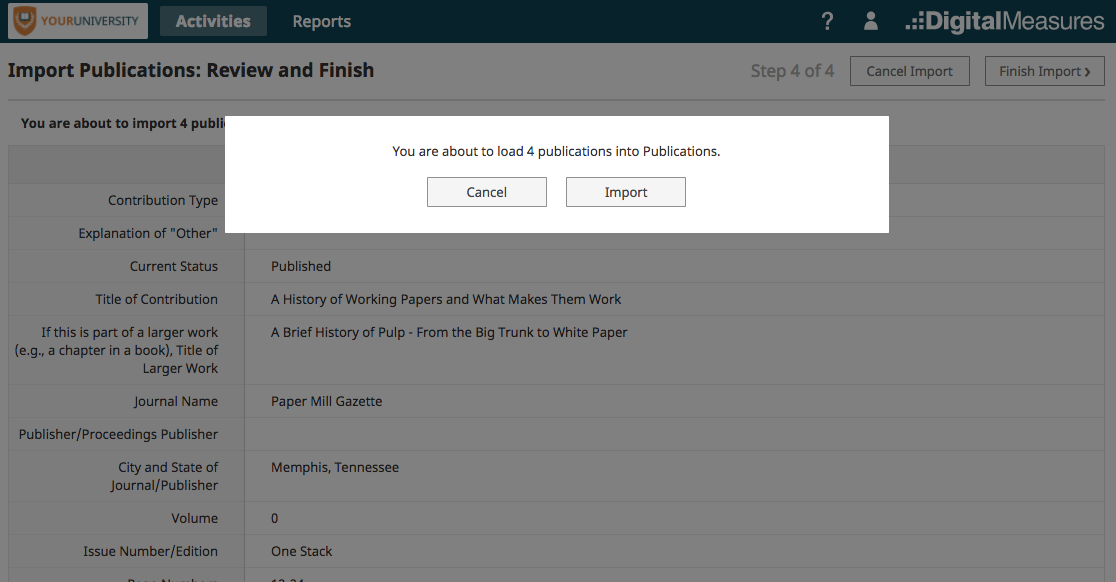
When you are satisfied that everything looks good, select the Finish Import button.
Faculty Success presents a confirmation box to ensure you wish to proceed. Select the Import button to continue.
Import Complete
The records are loaded into Faculty Success immediately and you will see the text X records successfully imported.

For answers to questions not listed here, please contact us.