Faculty/Staff Guide
Faculty Success Overview
Watermark Faculty Success organizes and builds reports on teaching, research and service activities. It enables you to keep track of your activity information just once so that many outputs can be prepared, such as annual activity reports, promotion and tenure documents, accreditation reports, your CV, your profile on your campus website and more. It also assists your administration in responding to requests for faculty-related data, rather than needing to continually ask you for the information. This enables your campus to communicate more effectively about your accomplishments.
Faculty Success is designed to be easy to navigate. To help you get started, here is a quick overview of the utilities you will work with most often.
Navigation Bar

The navigation bar displays at least two main utilities, Activities and Reports. You may have other utilities if your Faculty Success Administrator has given you security access to them.
- Activities: Add or update information about the activities you accomplish.
- Reports: Run reports that have been custom-built for your campus or create your own reports.
- Help: The question mark icon allows you to submit suggestions on how to improve the system, questions about use of the system, or report system errors.
- Notifications: The bell icon shows you notifications and messages from Faculty Success, including real-time information on new features and capabilities, as well as important system events like scheduled maintenance. You can also find feature tips, ways you can reduce data entry, and quick takeaways in the notifications area.
Activities
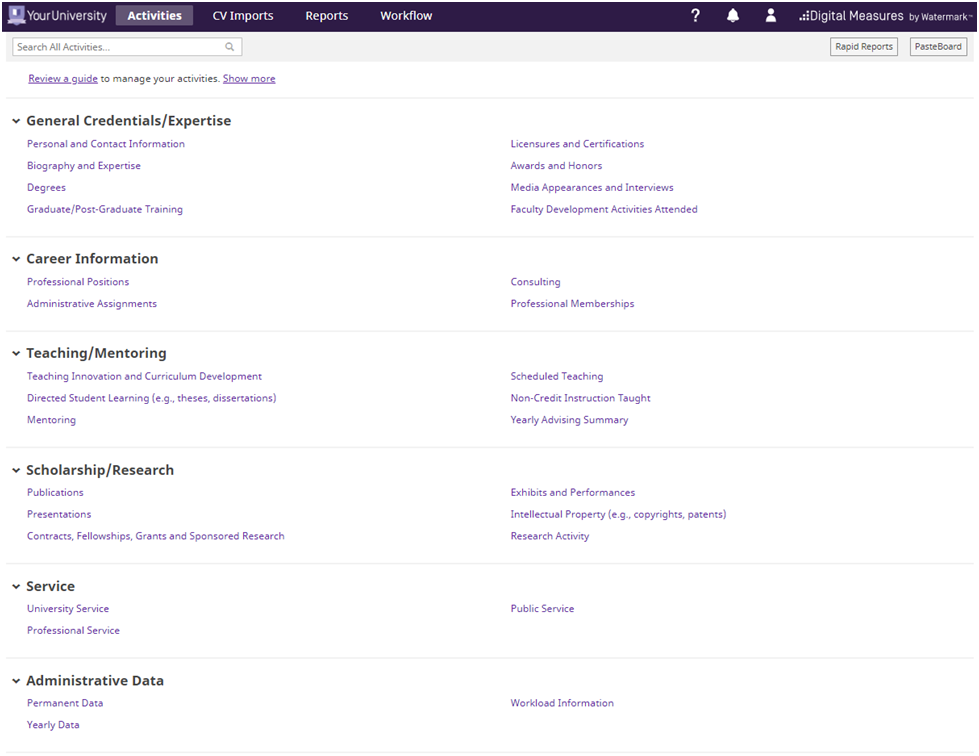
Overview
When you first visit this page, it would be good to spend a few minutes looking through the screens accessible from it. To access a screen, click its name. The resulting summary screen displays records that are stored for that screen. There are six possible actions you can take from the resulting screen, although not all of these actions will always be available:
- To add a new record, select the
 button.
 - To import items in bulk, select the
 button (available only for the Intellectual Contributions screen).
 - To delete a record, select the appropriate check box, then select the
 button.
 - To edit or view a record, click anywhere in the record row on the summary screen.
Note: Your Faculty Success Administrator may have added records to the system for you. These records can be viewed, but cannot be edited or deleted. A icon identifies these records. If revisions are needed to the records which have been entered on your behalf, contact your Faculty Success Administrator using the Help link.
 - To copy a record, select the appropriate check box, then select the
 button.
Saving Records
When working in the system, it is important that you preserve modifications by selecting one of the Save buttons at the top of the screen. If you attempt to navigate away from a screen containing unsaved changes, a warning message will display to determine whether you would like to return to the screen and save your modifications before proceeding.
Customizations
The screens available from the Manage Activities tab and all of the fields on them have been customized for your campus. These can still be changed in any way needed. To propose changes that you would like to see made, contact your Administrator using the Help link.
Reports
Use this utility to run reports that were custom-built for your campus or to create a new CV to your own specifications. For more information on customizing your own CV, click here.
Tips and Features
Take a look at the following key features that streamline data entry and reporting!
Expanding Text Boxes
You may see two diagonal lines in the bottom right corner of text boxes. Clicking this area and dragging allows you to resize the text box as needed.
Customizing Your Dynamic Summary Screens
Dynamic summary screens provide a list of your records for each of your Activity screens. This view presents your saved records in a table format and allows you to sort, filter and search so that you can easily find records.
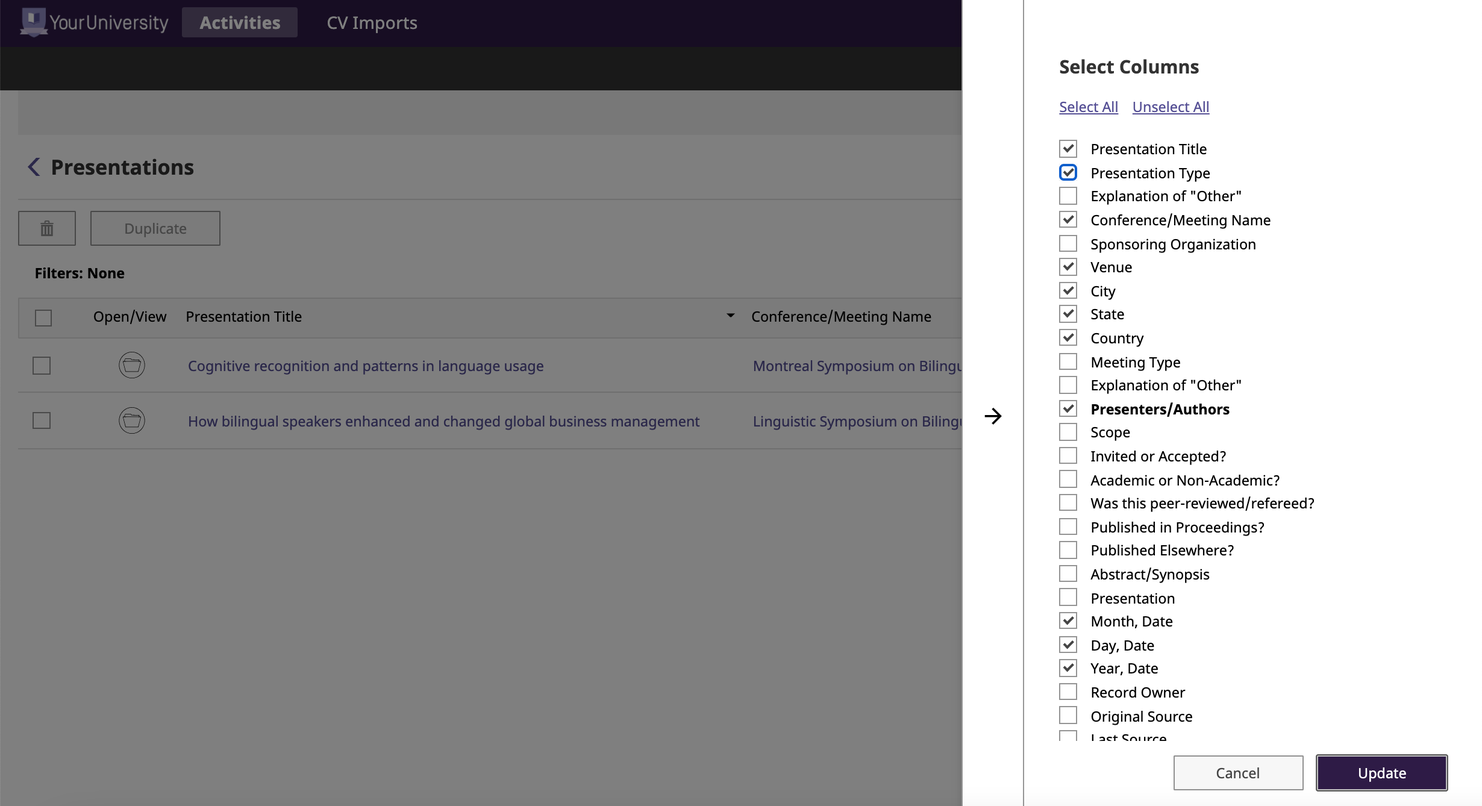
You can scroll through the table by clicking on the left/right arrows next to the Select Columns button.
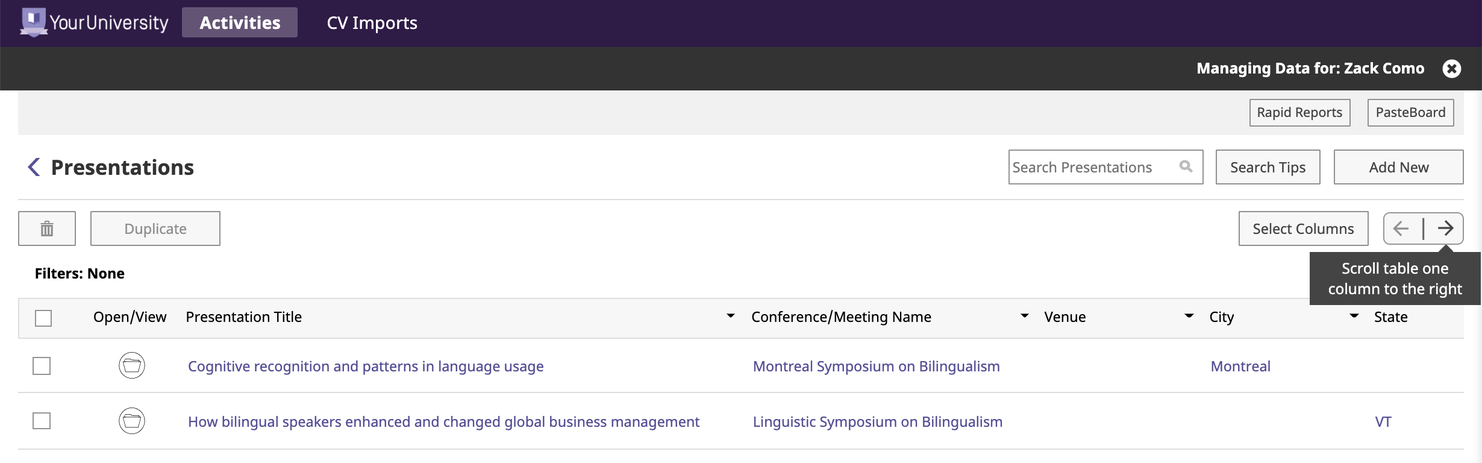
Each summary screen has already been pre-set with which fields you will see in the table. However, you can customize your own summary screen table by clicking on the Select Columns button in the top right. From there, a side bar will appear with the fields for that screen. You can customize by selecting the fields you want in your summary screen, and then clicking the  button. It is recommended that you have no more than 5-7 fields viewable on your Summary Screen.
You can sort records by clicking the arrow next to one of your column headers. From here, choose how you want to sort records.
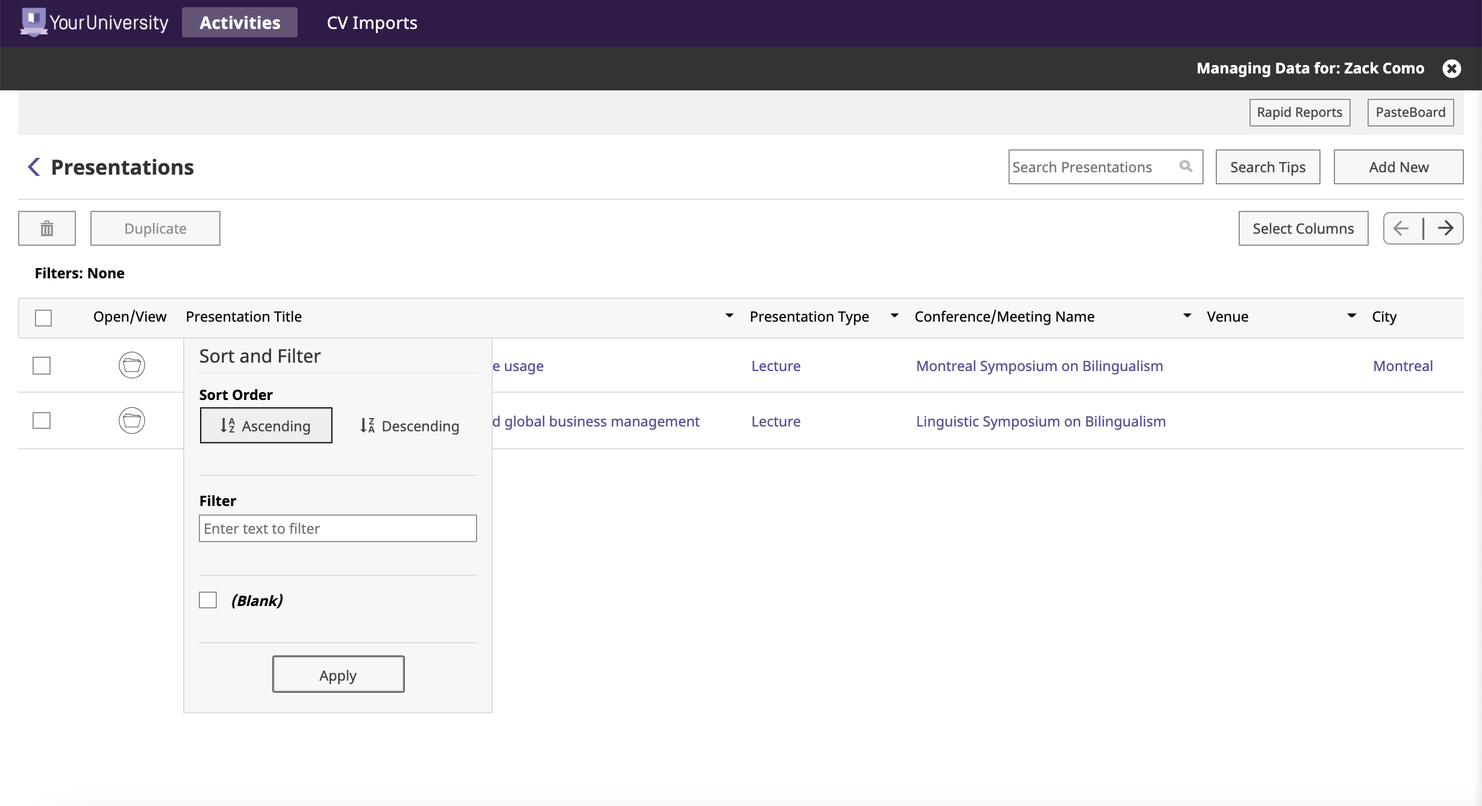
You can also apply a filter to your records in a similar way. Click the arrow next to one of your column headers, and choose how you want to filter.

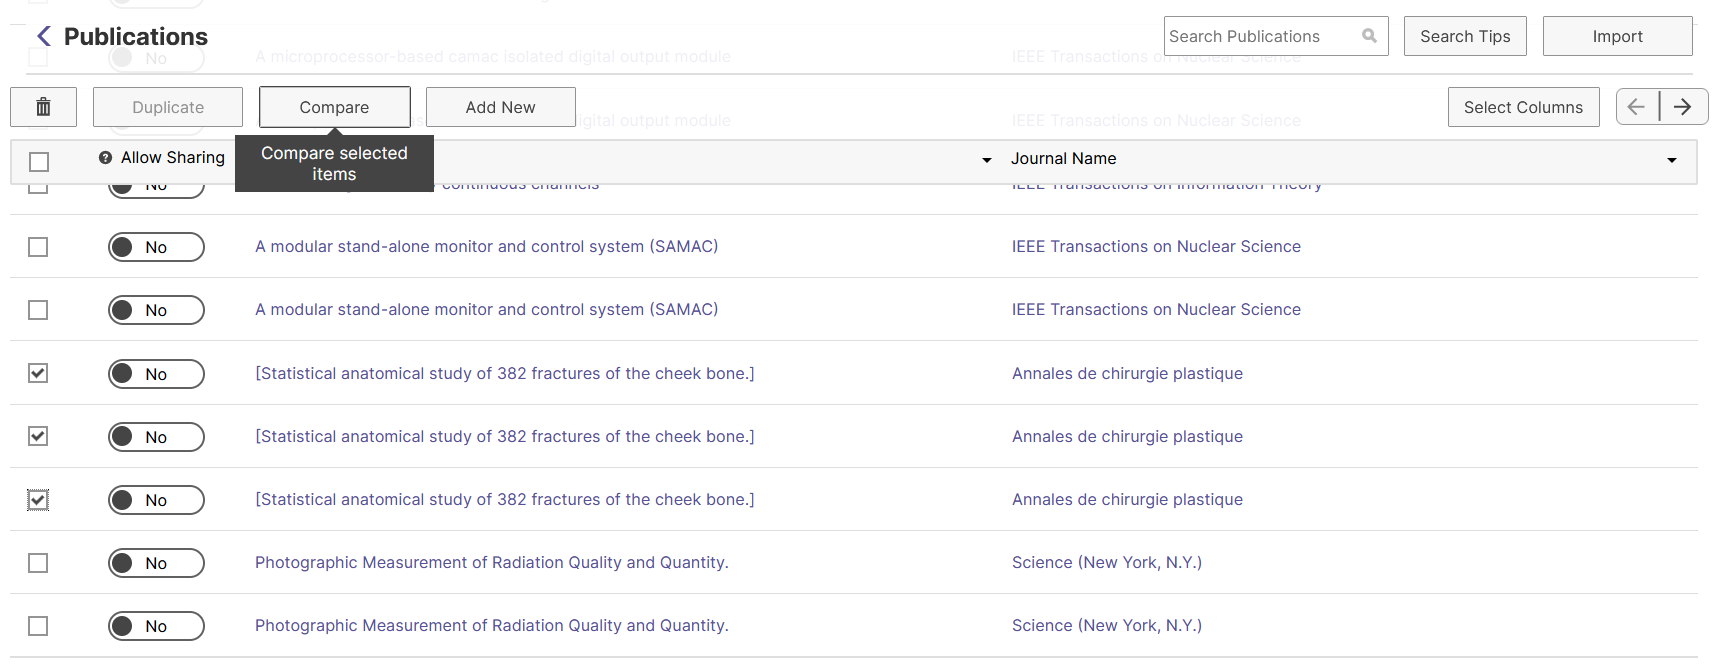
Compare and Merge
With the Compare option on the Activity summary screen, you can efficiently compare records and clean up duplicates. Select up to six potential duplicate records within the summary table and click the “Compare” button to get started.
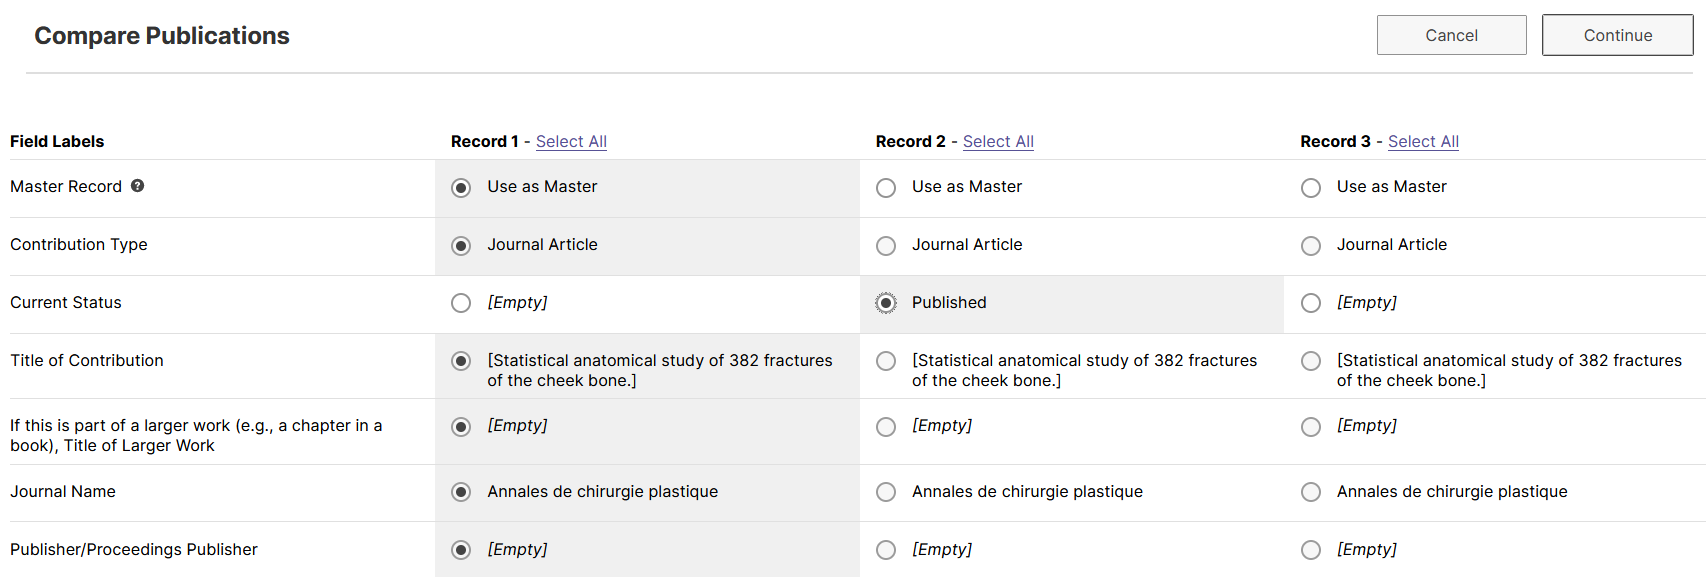
A side-by-side, field-by-field comparison of the selected entries makes it fast and easy to review differences. And if you’re comparing records so that you can resolve duplicates, this is also where you’ll choose which data from each record to keep when you merge them.
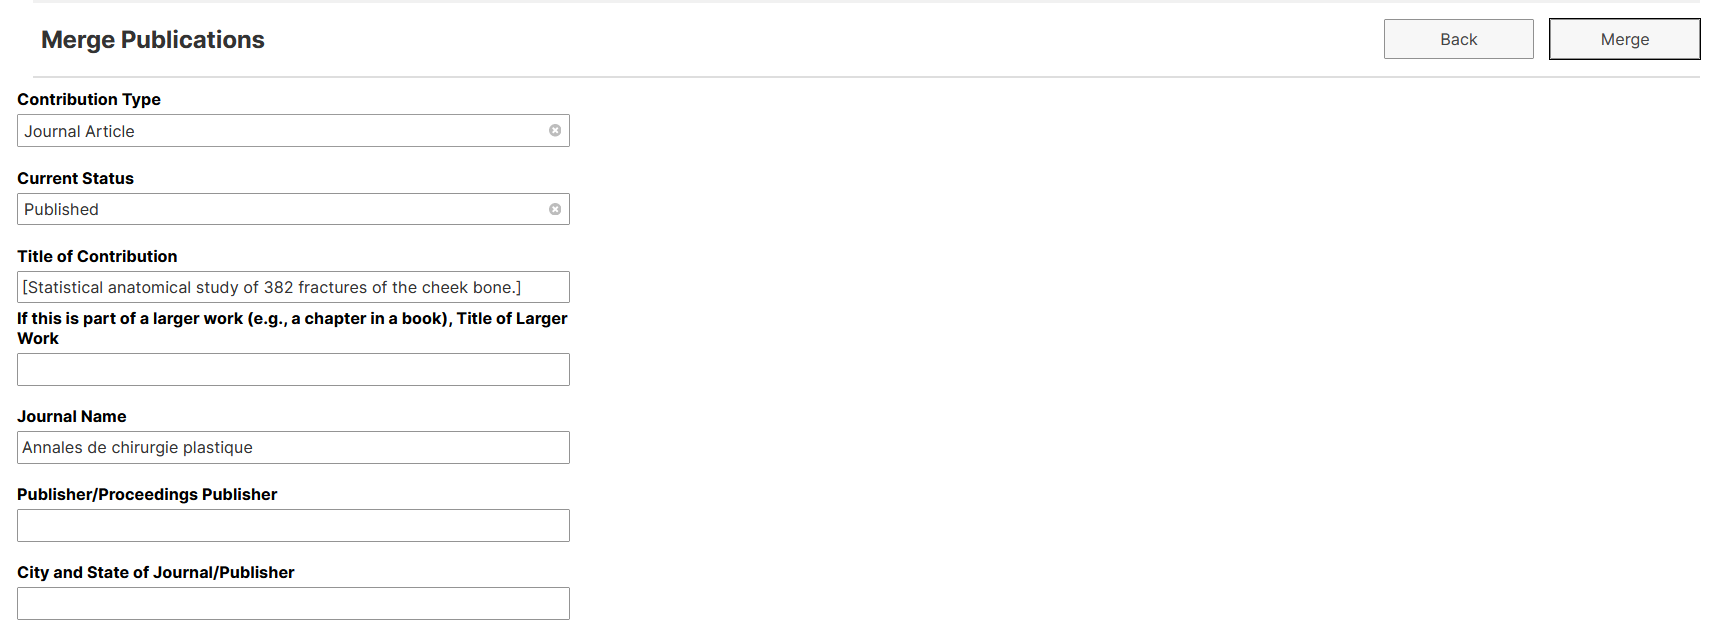
To prepare to merge records, first choose which record the data should be merged into (the “master record”), and then select the desired data for each data field. Once you have verified the data which should be kept as part of the resulting record, click the “Continue” button to preview the results of the merge.
The preview page will open in a familiar, editable view so you can easily review and confirm the results of your selections. If you need to modify a selection, you can go back to the comparison screen using the “Back” button. You can also edit any of the fields on the preview page directly, to correct something or add data that wasn’t originally part of the records you’re merging.
When you are ready to complete the process, click the “Merge” button to finalize the process of combining multiple records into one.
Import Data from a CV
The CV Importer feature in Watermark Faculty Success will help you get data into the system quickly and accurately using the source you most trust—your CV! We know you are busy and the goal of CV Imports is to allow you to spend less time entering data and more time with your Teaching, Service and Research activities.
The capability uses highlighting technology to identify areas of your CV that tie to specific fields within Faculty Success, customized to our system configuration. Once the highlighting is complete, you go through a series of steps to review, validate and confirm the upload.
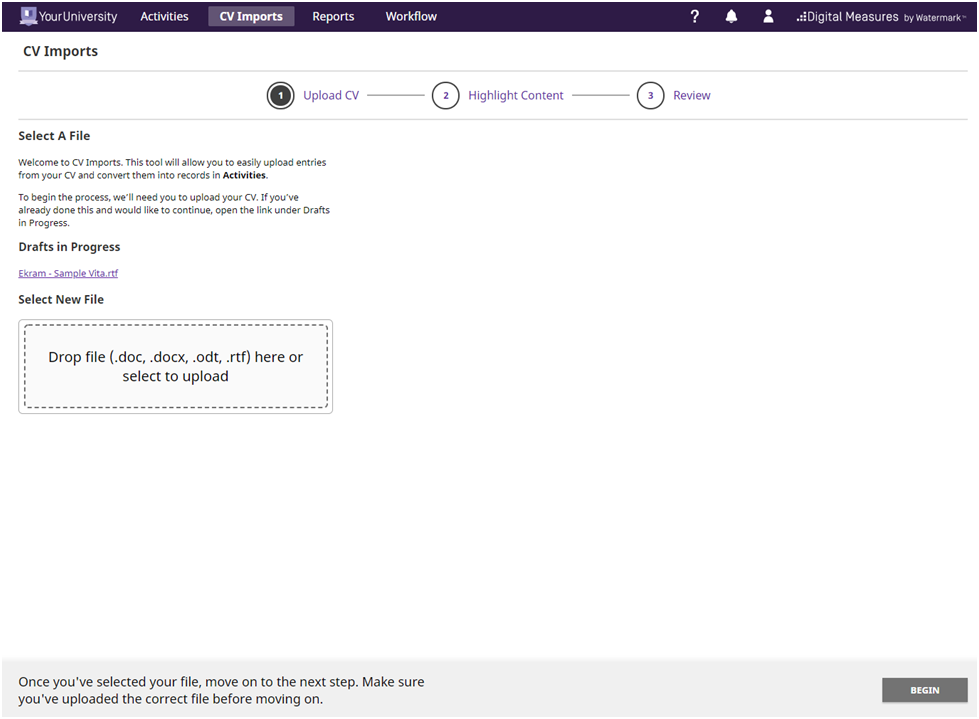
Access CV Imports in the top Navigation bar.

Upload your CV with a compatible format (.doc, .docx, .odt, .rtf). Previous uploads will appear as a Draft in Progress with a link to the uploaded file:
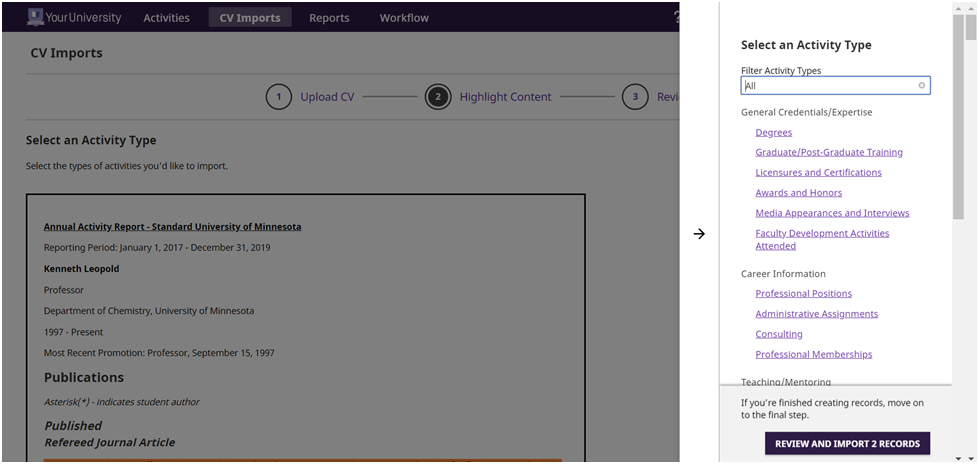
After selecting “Begin”, you will have the option of selecting specific sections of your uploaded CV to import into the database. A side bar will appear that includes the data collection screens available for importing data.
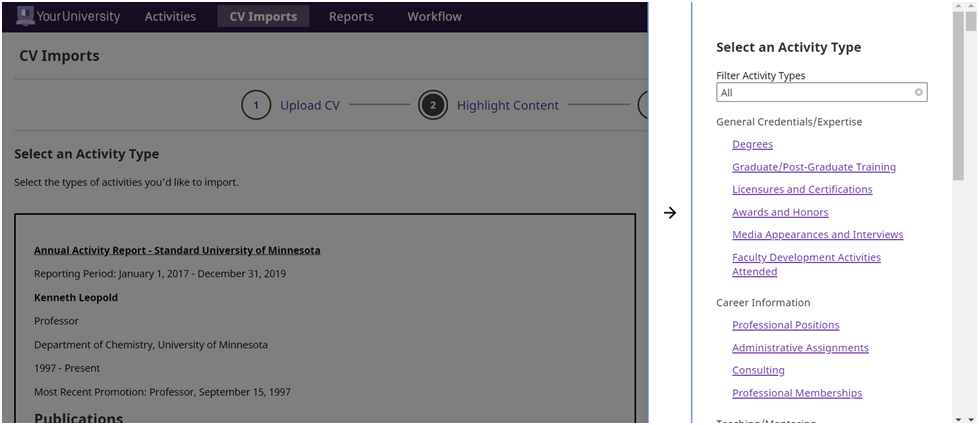
Use the “Filter Activity Types” field to filter activity types that have been completed, started, or not started.
After selecting the Activity Type, you will be asked to complete the following actions:
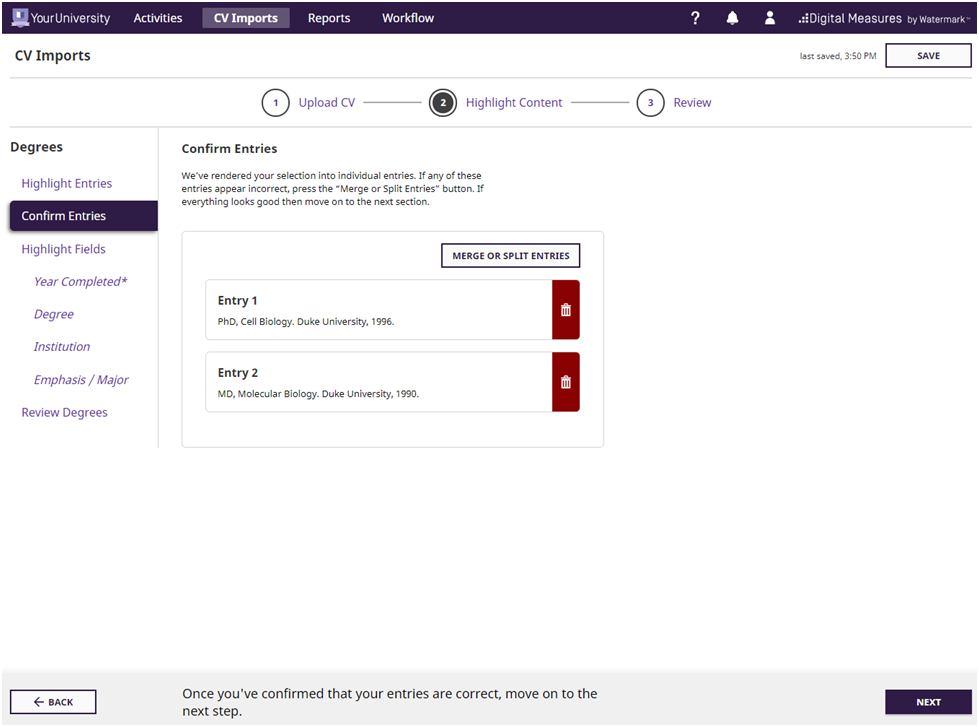
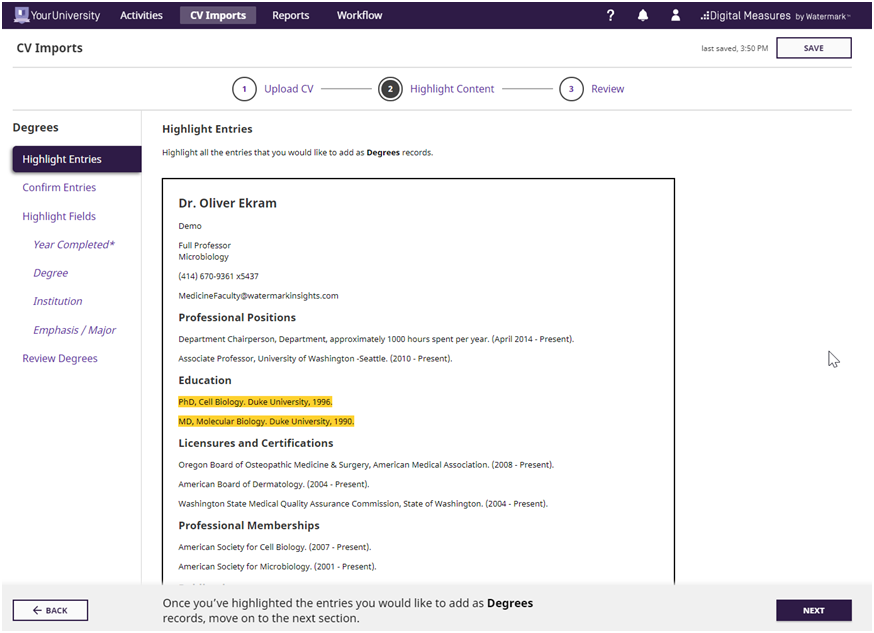
- Highlight Entries: Highlight all records that match the selected Activity Type as they appear within your CV. Multiple records can be highlighted, and by clicking on a highlighted entry, you have the option to keep or remove that record from the import.
- Confirm Entries: After highlighting all relevant activities, you will then have the opportunity to verify the records selected in Highlight Entries. Each of the highlighted records will appear as a separate entry for review. Records that appear to be parsed incorrectly can be merged or split through the “Merge or Split Entries” button. To merge or split these records, highlight the record to match the desired layout and press “Next” once this has been completed.
-
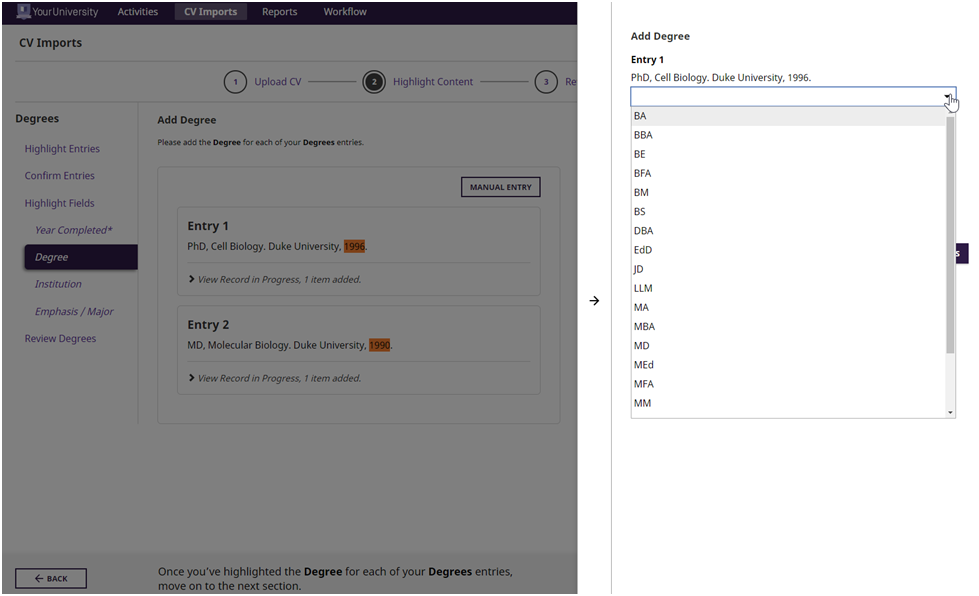
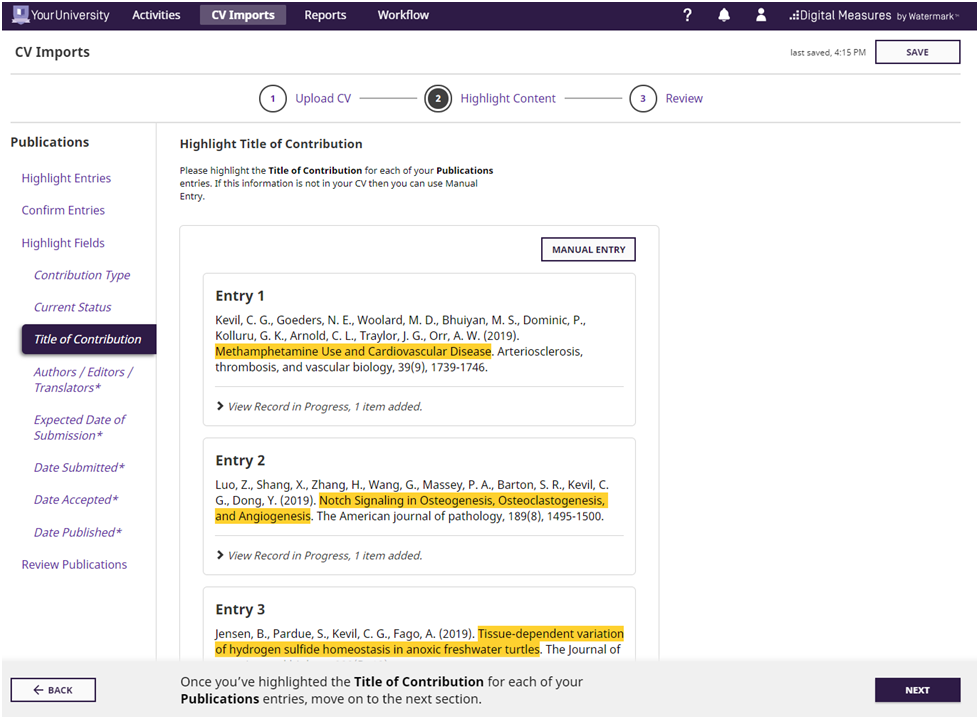
Highlight Fields: Now that activities from the uploaded CV have been identified, you can associate required and recommended fields within Faculty Success to the highlighted entries. Required and recommended fields are determined by your institution administrator.
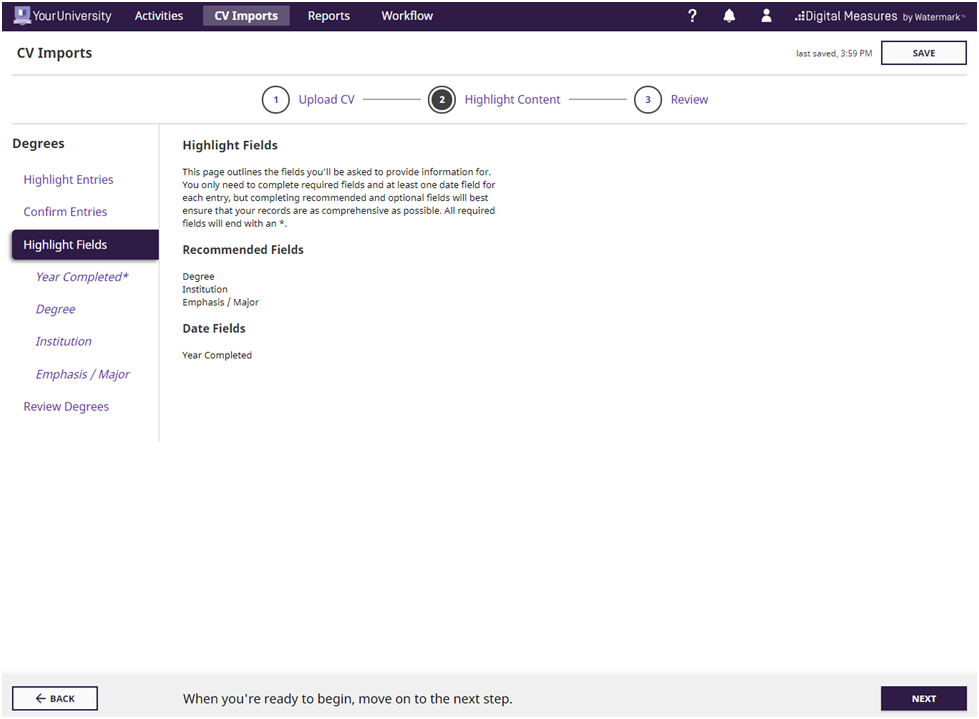
After selecting one of the required or recommended fields, you will be prompted to classify the record according to the nature of the field.
For fields with drop down list values, a drawer will appear in the right half of your screen. From here you can select the appropriate value for each entry.
For text fields, such as the title of a Publication, you can highlight the relevant portion of your CV entry.
Any data needed for a field in Faculty Success that does not exist in your CV can be manually entered by using the “Manual Entry” button.
If you need to move to a different Activity type before finishing the review process of their current Activity Type, you can access the drawer menu by clicking on "Highlight Content" within the step indicator.
-
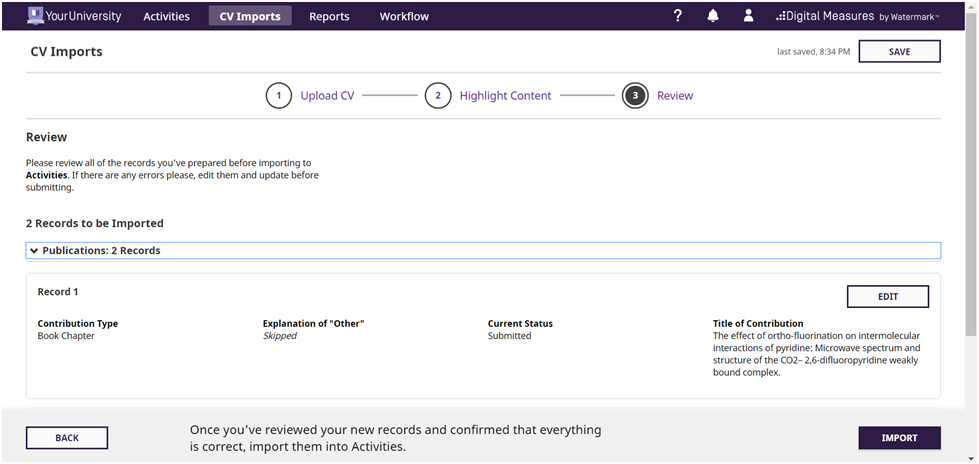
Review Records: After highlighting all of the necessary fields for each activity, you will have the opportunity to review and edit each entry before importing.
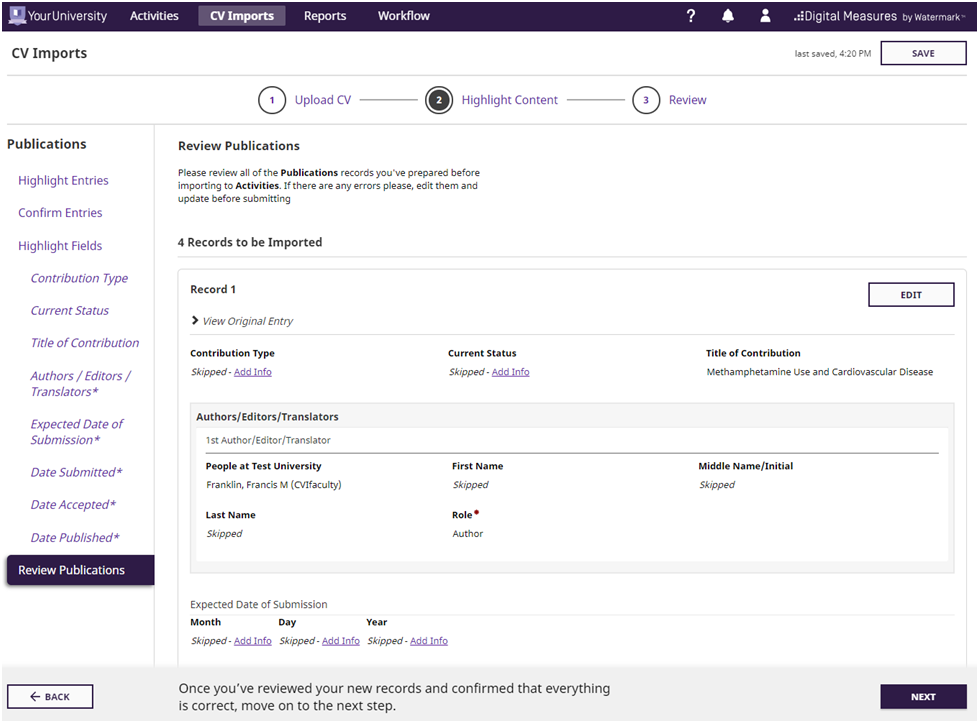
After confirming the accuracy of your entries, the Activity Type sidebar will appear and allow you to continue the parsing process for other activities, or to proceed to the final review before importing.
- Import Records: The final review screen will show all of the records to be imported alongside the required and recommended fields associated with such records. Once you have confirmed the accuracy of all records, click “Import” in the lower right hand corner of your screen.

Import Citations from Other Systems
There are two ways for you to bring citations into Faculty Success from other databases.
First, you can load BibTeX files into Faculty Success. BibTeX Imports enable you to import citations from a wide variety of reference managers or databases — for example, EndNote, Google Scholar, Mendeley, RefWorks, HeinOnline or Zotero. For more information on BibTeX Imports, please visit this page.
Second, you can import citations directly from Crossref and PubMed. If your campus has a subscription, you can also import directly from ORCID, Scopus and Web of Science. Visit this page for details on this feature.
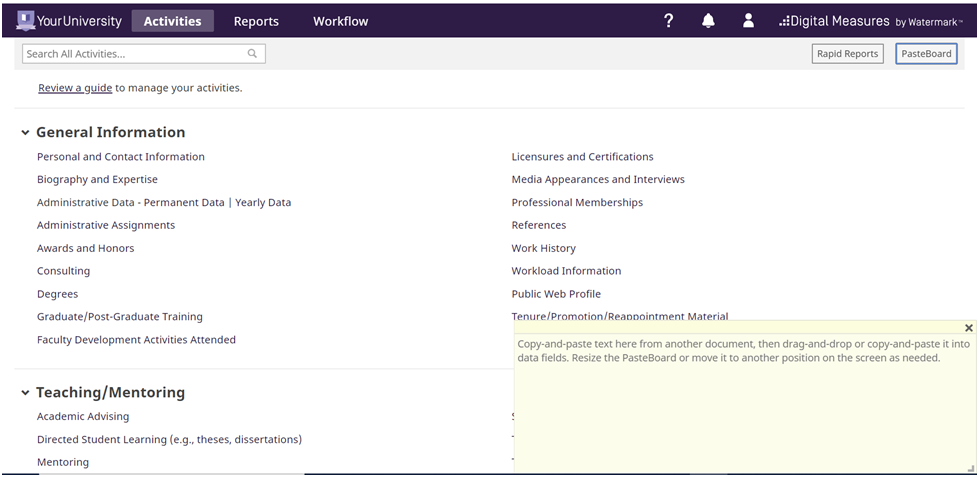
PasteBoard
You will find the PasteBoard to be a time-saving feature. The PasteBoard allows you to copy text from another document, such as your vita in Microsoft Word, and paste it into the PasteBoard. After you have pasted text into the PasteBoard, you can then select text from it, click-and-hold on the text you selected, and drag the it into a field in the system.
To access the PasteBoard, click the text PasteBoard in the left-hand menu under Manage Activities. The PasteBoard will appear in the bottom right-hand corner of your screen and can be dragged anywhere on the screen as needed. Any text in the PasteBoard upon logging out will remain in the PasteBoard for future sessions.
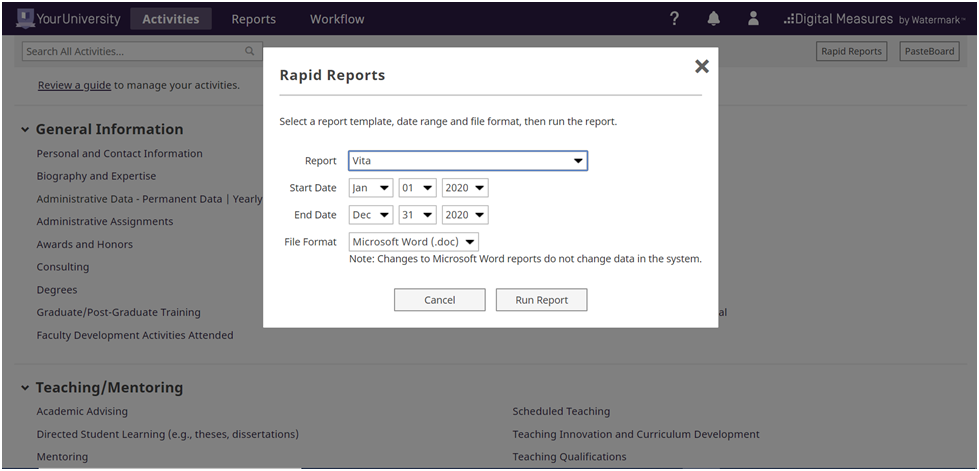
Rapid Reports
While you are managing your activities, you may want to see how a particular change looks on a report. Rapid Reports provides you with quick and easy access to the reports you can run from Faculty Success.
FAQs
Does Faculty Success have spell check?
Most modern browsers have settings or preferences which enable the browser to check your spelling as you type across all web applications.
How do I know where to put each of my different types of activities?
We intend for the names of each screen to assist you in determining this. With this said, each campus has the ability to customize Faculty Success to meet its own specific needs, and as a result many have created their own custom materials to provide guidance in response to this question. We encourage you to contact your Faculty Success Administrator to inquire if such a document is available, or with any specific questions you may have.